
Auto-Scaling No Jutsu
Reading Time: 6 minutesYou knew that could happen… it’s part of life and shit happens. Your precious distributed system has been deployed on Monday for the first time in the production environment, with real traffic, brilliant!, all good so far… and on Friday evening, “that” happened. The system starts to raise HTTP 500 status code, just dropping requests like hell, and your dashboards turn from a beautiful green to bloody red. What do you do now?

kubectl scale deployment.v1.apps/my-critial-deployment --replicas=10 #No Jutsu!!That’s a lesson learned: Implement auto-scaling for the Kubernetes deployment by next Monday morning so I don’t have to keep an eye open on the alert system (at least for this).
In this article we will address the Kubernetes auto-scaling feature, how does it work, the complexity of this feature, and some bad practices. Engage!
From the announcement made in 2016, for version 1.3, the auto-scaling feature is defined as the way Kubernetes will automatically scale up your cluster as soon as you need it, and scale it back down to save you money when you don’t.
How Does This Jutsu Work?
The auto-scaling feature in Kubernetes resides in two parts: requested and limits resources for the Pods, and the Horizontal Pod Autoscaler (HPA). The values for this are based on metrics from CPU, memory, or even more complex metrics.
First, you have to set the resources that your Pod will request and the limit, based on the measure of that resource, on which the Pod should die, because exceeding that limit, and resurrect as a new Pod.
Usually, an example saves time of re-reading these kind of descriptions, so let’s put one in place. Imagine your application, from your performance test results, needs 1/2 of cores, in terms of CPU, but it starts to misbehave when it reaches 50MB of memory consumption. From there, you already know the value for the resources request that you have to set in your deployment and the limits. So, you should request at least 1/2 cores, based on CPU resource, and set a limit of 50MB, based on memory resource.
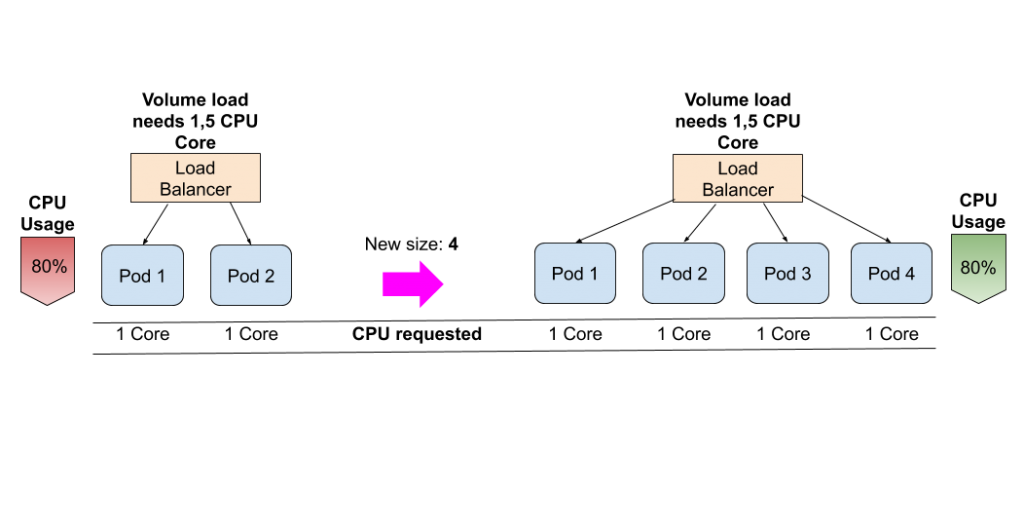
Second, you have to define the Kubernetes HPA spec, where you will indicate from which values or percentages, your deployment should automatically create more Pods (scale-up) or remove Pods (scale-down).
Again, an example. You want that when the CPU consumption (on average) of the Pods, that represents your deployment, reaches/exceeds the 80% of consumption, the Kubernetes API should command the scale-up action. Doing this, there will be more Pods to handle the load, which means each of them will have “less work to do” and the CPU consumption will tend to go down. The Kubernetes API, together with the information provided by Kubernetes Metrics Server, will scale-up until there are enough Pods to reduce the percentage of CPU used by the deployment and meet the expectations set on the HPA spec. When the cuddle is gone, and the Kubernetes Metric Server reports that the CPU consumption is really low, the Kubernetes API will scale-down back your deployment until the minimum number of Pods set on the HPA spec.
The example provided is, of course, too simplistic when you plan to go into production but the way Kubernetes HPA feature is as described above. The way to move forward here is, as many times, change and adapt. The links provided in the first paragraph of this section are really good for going deeper into the understanding of the Kubernetes auto-scaling feature.
Use It Wisely
Even though you clearly understood how the auto-scaling works, now you have to know which values you need to configure in the limits and requests sections for your deployment. For this, you really have to measure your application, as it was illustrated in the example from the previous section. A strong performance test, with clear and well-defined outcomes, it’s something that will help you with that. Knowing until how much CPU or memory consumption your application starts to misbehave is a good starting point.
When you become more experienced in the auto-scaling feature, or you are just forced to become an expert very fast, you will find very interesting the way you can use the Custom Metrics. This topic is deep enough to be addressed in a separate article.
Everything has a limit. Pretending to scale-up in an unlimited way is not feasible nor desirable. The HPA feature comes with minReplicas and maxReplicas parameters for helping on this. About the minimum number of Pods (replicas), it depends on your use case. Most probably you should set 1 or 2 (if you want to avoid a single point of failure from the scratch) or, in some cases, you will even need to set 0. For the maximum number of replicas, here is where you have to be careful for not ending up collapsing your Kubernetes cluster because a deployment got a lot of load, scaled-up like crazy, and consumed all your resources.
Something that it’s also important in auto-scaling is the idea about where all your Pods are running. Have you ever heard “do not put all my eggs in one basket”? That applies to Kubernetes world as well. Your auto-scaling definition could be perfectly defined and measured to ensure that the service scales up/down in perfect time and saving your resources. But, what if all the Pods of your application are deployed in the same Kubernetes node and that node just crashes?

Oh yes, you would be naked. In Kubernetes 1.6 it was announced the node affinity/anti-affinity features that come along for saving you to be naked and looking for the solution in the wrong direction. Basically, this affinity/anti-affinity rules will help you to ensure that not all Pods are in the same node and they are distributed across your Kubernetes cluster, and giving you the possibility to have a great auto-scaling design.
If two are not enough?
Many times, scaling up your deployments will solve your problems, and, actually, many times the problem is that your deployment was just too small (in terms of resources request) to face what it was in front of it. One single pod, to manage that amount of load, it’s just not enough but, from your previous analysis, the application is up for the challenge. It just needs a couple of partners from time to time, and here is where the Kubernetes Auto-Scaling No Jutsu comes to play.
However, sometimes the problem is not the load that you are receiving in your system but the performance of the applications that are supporting that load. It happens many times that the applications developed do not offer a proper performance or the best performance that they could offer. Also, we, the developers, do not pay enough attention to those tools like SonarQube, or similar, that advertise about possible issues on our code. How many Java classes my application has? what is the inheritance level? or the cyclomatic complexity?, actually, should I have developed that application in Java?, do I really need Kubernetes to deploy my application?. All these are interesting questions that Developers, Software Engineers, and Technical Leaders should ask, and answer, before just start coding.
The proper resource allocation is something already mentioned in this article and really important. You have to understand the resources that your application, and the Pod that will represent each instance of your application, needs to behave as it supposed to be. For example, in the case of Java applications, you should reserve enough JVM Heap memory (-Xmx) in the Dockerfile for the container that will live in a Pod, and, from there, you set a good value in the resources requests and limits for headroom.
Can the application’s performance problems be mitigated scaling up at the Kubernetes level? Most probably, yes. It’s very easy just run the Kubernetes command to scale up your deployment and get rid of your load issues very fast. If we do not think about other possibilities to solve the scalability issues, we are coming into bad practices that will drive you in budget and resource consumption problems.
Summary
Summarizing, Kubernetes auto-scaling is a great feature, that many other IaaS platforms tried to put in place in the past like OpenStack Heat, which brings a lot of flexibility for your deployments and helps you to “save money”. It’s also hard to understand and maybe more to expertise, but it’s definitely something that you will have to put on the table when you go into production.